2.1. Build a Demo ParallelCluster#
Step by Step Instructions to Build a Demo ParallelCluster.
Establish Identity and Permissions
AWS Identity and Access Management Roles Requires the user to have AWS Identity and Access Management roles in AWS ParallelCluster
AWS ParallelCluster uses multiple AWS services to deploy and operate a cluster. See the complete list in the AWS Services used in AWS ParallelCluster section. It appears you can create the demo cluster, and even the intermediate or advanced cluster, but you can’t submit a slurm job and have it provision compute nodes until you have the IAM Policies set for your account. This likely requires the system administrator who has permissions to access the AWS Web Interface with root access to add these policies and then to attach them to each user account.
Use the AWS Web Interface to add a policy called AWSEC2SpotServiceRolePolicy to the account prior to running a job that uses spot pricing on the ParallelCluster.
2.1.1. Install Parallel Cluster AWS CLI 3.14.2#
Use Parallel Cluster AWS Command Line Interface (CLI) v3.14.2 to configure and launch a demo cluster
Requires the user to have a key.pair that was created on an ec2.instance
See also
Note, the latest version of pcluster requires a ed25519_key.
To create this key, login to your ec2 instance website for your account.
On the left menu, look for Key Pairs under Network and Security
Click on the orange button to Create a key pair
Specify a name.
Choose ED25519 as the key pair type
Choose pem as the format

Click `Create key pair`
Download the key pair to your local machine, and use the following command to set the permissions of your private key file.
chmod 400 your_user_name-key-pair-region_name.pem
Install AWS ParallelCluster Command Line Interface on your local machine
Create a virtual environment on a linux machine to install aws-parallel cluster
python3 -m virtualenv ~/apc-ve
source ~/apc-ve/bin/activate
python --version
python3 -m pip install --upgrade aws-parallelcluster
pcluster version
Install node.js
curl -o- https://raw.githubusercontent.com/nvm-sh/nvm/v0.38.0/install.sh
chmod ug+x ~/.nvm/nvm.sh
source ~/.nvm/nvm.sh
nvm install node
node --version
Verify that AWS ParallelCluster is installed on local machine
Run pcluster version.
pcluster version
Output: (note, this version number may change over time)
{
"version": "3.14.2"
}
Note
If you start a new terminal window, you need to re-activate the virtual environment using the following commands:
source ~/apc-ve/bin/activate
source ~/.nvm/nvm.sh
To update to the latest version of parallel cluster, use the following command:
python3 -m pip install --upgrade "aws-parallelcluster"
Verify that the parallel cluster is working using:
pcluster version
Configure AWS Command line credentials on your local machine
aws configure
2.1.2. Configure a Demo Cluster (recent upgrade with instructions to use an hpc compute node)#
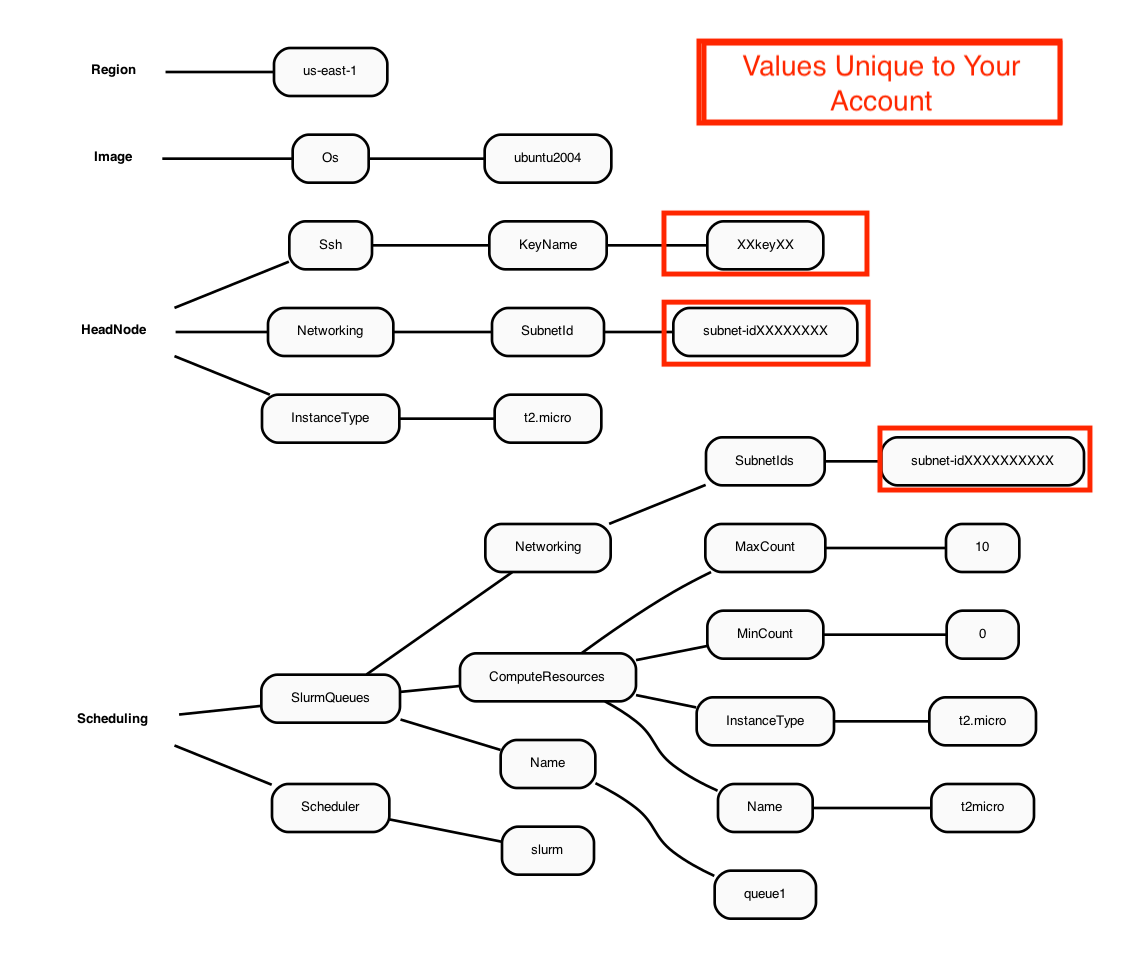
To create a parallel cluster, a yaml file needs to be created with Network subnetID and pem key names that are unique to your account.
An example of the yaml file contents is described in the following Diagram:
Figure 1. Diagram of YAML file used to configure a ParallelCluster with a c7g.large head node and hpc7g.16xlarge compute nodes
See also
Create a yaml configuration file for the cluster following these instructions
pcluster configure --config hpc7g.test.yaml
Input the following answers at each prompt:
Allowed values for AWS Region ID:
us-east-1Allowed values for EC2 Key Pair Name:
choose your key pairAllowed values for Scheduler:
slurmAllowed values for Operating System:
ubuntu2404Head node instance type:
c7g.largeNumber of queues:
1Name of queue 1:
queue1Number of compute resources for queue1 [1]:
1Compute instance type for compute resource 1 in queue1:
hpc7g.16xlargeMaximum instance count [10]:
10Enabling EFA requires compute instances to be placed within a Placement Group. Please specify an existing Placement Group name or leave it blank for ParallelCluster to create one. Placement Group name []:
Automate VPC creation?:
yAllowed values for Availability Zone:
1Allowed values for Network Configuration:
2. Head node and compute fleet in the same public subnet
Beginning VPC creation. Please do not leave the terminal until the creation is finalized
Note
The choice of operating system (specified during the yaml creation, or in an existing yaml file) determines what modules and gcc compiler versions are available.
Centos7 has an older gcc version 4
Ubuntu2404 has gcc version 9+
Alinux or Amazon Linux/Red Hat Linux (haven’t tried)
Examine the yaml file
cat hpc7g.test.yaml
Region: us-east-1
Image:
  Os: ubuntu2204
HeadNode:
  InstanceType: c7g.large
  Networking:
    SubnetId: subnet-xx-xx-xx                  <<< unique to your account
  Ssh:
    KeyName: your-key                          <<< unique to your account
Scheduling:
  Scheduler: slurm
  SlurmQueues:
  - Name: queue1
    ComputeResources:
    - Name: hpc7g16xlarge
      InstanceType: hpc7g16xlarge
      MinCount: 0
      MaxCount: 10
      Efa:
        Enabled: true
    Networking:
      PlacementGroup:
        Enabled: true
      SubnetIds:
      - subnet-xx-xx-xx                        <<< unique to your account
Note
The above yaml file is the very simplest form available. If you upgrade the compute node to using a faster compute instance, then you will need to add additional configuration options (networking, elastic fabric adapter) to the yaml file. These modifications will be highlighted in the yaml figures provided in the tutorial.
The key pair and Subnetid in the yaml file are unique to your account. To create the AWS Intermediate ParallelCluster, the key pair and subnet ID from the new-hello-world.yaml file that you created using your account will need to be transferred to the Yaml files that will be used to create the Intermediate ParallelCluster in the next section of the tutorial. You will need to edit these yaml files to use the key pair and your Subnetid that are valid for your AWS Account.
2.1.3. Create a Demo Cluster#
pcluster create-cluster --cluster-configuration hpc7g.test.yaml --cluster-name test-pcluster --region us-east-1
Check on the status of the cluster
`pcluster describe-cluster –region=us-east-1 –cluster-name test-pcluster
List available clusters
pcluster list-clusters --region=us-east-1
Check on status of cluster again
pcluster describe-cluster --region=us-east-1 --cluster-name test-pcluster
After 5-10 minutes, you see the following status: “clusterStatus”: “CREATE_COMPLETE”
While the cluster has been created, only the c7g.large head node is running. Before any jobs can be submitted to the slurm queue, the compute node status needs to be checked.
Note
The compute nodes are not “provisioned” or “created” at this time (so they do not begin to incur costs). The compute nodes are only provisioned when a slurm job is scheduled. After a slurm job is completed, then the compute nodes will be terminated after 5 minutes of idletime.
Verify that the output from describe-cluster contains the following output;
“computeFleetStatus”: “RUNNING”, “clusterStatus”: “UPDATE_COMPLETE”,
If the computeFleetStatus is “UNKNOWN” there is likely a missing IAM Policy. Please review the log file from the parallelcluster CLI on your local machine for any errors:
tail ~/.parallelcluster/pcluster-cli.log
2.1.4. Login to the ParallelCluster#
Note
replace the your-key.pem key pair with your key pair you will need to change the permissions on your key pair so to be read only by owner.
cd ~
chmod 400 your-key.pem
Example: pcluster ssh -v -Y -i ~/your-key.pem –cluster-name test-pcluster
pcluster ssh -v -Y -i ~/[your-key-pair] --cluster-name test-pcluster
login prompt should look something like (this will depend on what OS was chosen in the yaml file).
[ip-xx-x-xx-xxx pcluster-cmaq]
Check what modules are available on the ParallelCluster
module avail
Check what version of the compiler is available
gcc --version
Need a minimum of gcc 8+ for CMAQ
Check what version of openmpi is available
mpirun --version
Need a minimum openmpi version 4.0.1 for CMAQ
Verify that Slurm is available (if slurm is not available, then you may need to try a different OS)
which sbatch
Do not install sofware on this test cluster
Save the key pair and SubnetId from this hpc7g.test.yaml to use in the yaml for the Intermediate Tutorial
2.1.5. Exit the cluster#
exit
2.1.6. Delete the Demo Cluster#
pcluster delete-cluster --cluster-name test-pcluster --region us-east-1
See also
pcluster --help