Advanced Tutorial (optional)
Use ParallelCluster without Software and Data pre-installed#
Step by step instructions to configuring and running a ParallelCluster for the CMAQ 12US2 benchmark with instructions to install the libraries and software.
Notice
Skip this tutorial if you successfully completed the Intermediate Tutorial. Unless you need to build the CMAQ libraries and code and run on a different family of compute nodes, such as the c6gn.16xlarge compute nodes AMD Graviton.
Create CMAQ Cluster using SPOT pricing#
Use an existing yaml file from the git repo to create a ParallelCluster#
cd /your/local/machine/install/path/
Use a configuration file from the github repo that was cloned to your local machine#
git clone -b main https://github.com/CMASCenter/pcluster-cmaq.git pcluster-cmaq
cd pcluster-cmaq
Edit the c5n-4xlarge.yaml#
vi c5n-4xlarge.yaml
Note
the c5n-4xlarge.yaml is configured to use SPOT instance pricing for the compute nodes.
the c5n-4xlarge.yaml is configured to the the c5n-4xlarge as the compute node, with up to 10 compute nodes, specified by MaxCount: 10.
the c5n-4xlarge.yaml is configured to disable multithreading (This option restricts the computing to CPUS rather than allowing the use of all virtual CPUS. (16 virtual cpus reduced to 8 cpus)
given this yaml configuration, the maximum number of PEs that could be used to run CMAQ is 8 cpus x 10 = 80, the max settings for NPCOL, NPROW is NPCOL = 8, NPROW = 10 or NPCOL=10, NPROW=8 in the CMAQ run script.
Replace the key pair and subnet ID in the c5n-4xlarge.yaml file with the values created when you configured the demo cluster#
Region: us-east-1
Image:
  Os: ubuntu2004
HeadNode:
  InstanceType: c5n.large
  Networking:
    SubnetId: subnet-xx-xx-xx           << replace
  DisableSimultaneousMultithreading: true
  Ssh:
    KeyName: your_key                     << replace
Scheduling:
  Scheduler: slurm
  SlurmQueues:
    - Name: queue1
      CapacityType: SPOT
      Networking:
        SubnetIds:
          - subnet-xx-xx-x         x    << replace
      ComputeResources:
        - Name: compute-resource-1
          InstanceType: c5n.4xlarge
          MinCount: 0
          MaxCount: 10
          DisableSimultaneousMultithreading: true
SharedStorage:
  - MountDir: /shared
    Name: ebs-shared
    StorageType: Ebs
  - MountDir: /fsx
    Name: name2
    StorageType: FsxLustre
    FsxLustreSettings:
      StorageCapacity: 1200
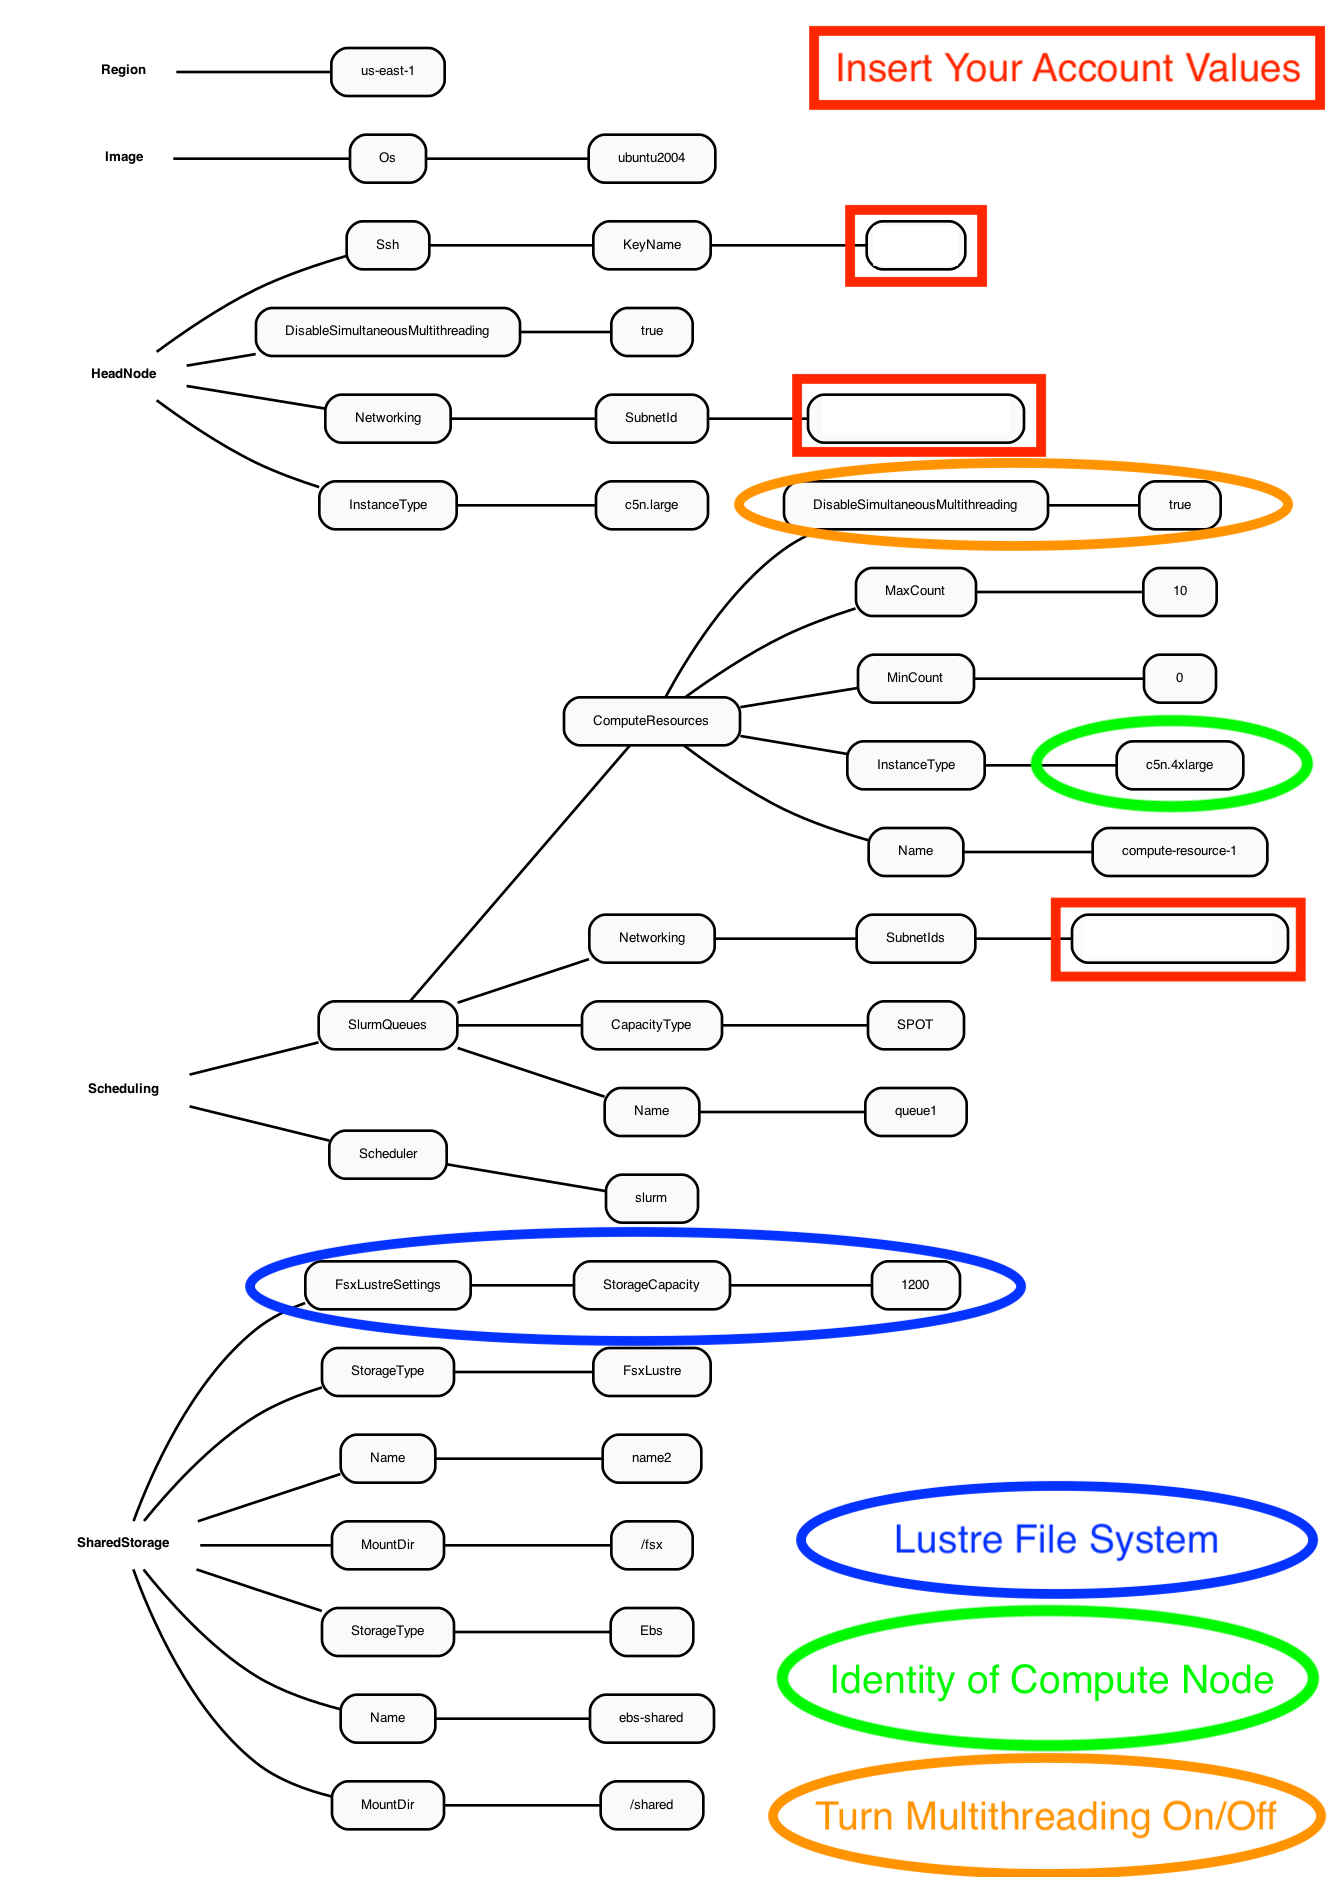
The Yaml file for the c5n-4xlarge contains the settings as shown in the following diagram.#
Figure 1. Diagram of YAML file used to configure a ParallelCluster with a c5n.large head node and c5n.4xlarge compute nodes using SPOT pricing

Create the c5n-4xlarge pcluster#
pcluster create-cluster --cluster-configuration c5n-4xlarge.yaml --cluster-name cmaq --region us-east-1
Check on status of cluster#
pcluster describe-cluster --region=us-east-1 --cluster-name cmaq
After 5-10 minutes, you see the following status: “clusterStatus”: “CREATE_COMPLETE”
Start the compute nodes#
pcluster update-compute-fleet --region us-east-1 --cluster-name cmaq --status START_REQUESTED
Login to cluster#
Note
Replace the your-key.pem with your Key Pair.
pcluster ssh -v -Y -i ~/your-key.pem --cluster-name cmaq
Show compute nodes#
scontrol show nodes
Output:
NodeName=queue1-dy-compute-resource-1-10 CoresPerSocket=1
   CPUAlloc=0 CPUTot=8 CPULoad=N/A
   AvailableFeatures=dynamic,c5n.4xlarge,compute-resource-1
   ActiveFeatures=dynamic,c5n.4xlarge,compute-resource-1
   Gres=(null)
   NodeAddr=queue1-dy-compute-resource-1-10 NodeHostName=queue1-dy-compute-resource-1-10
   RealMemory=1 AllocMem=0 FreeMem=N/A Sockets=8 Boards=1
   State=IDLE+CLOUD+POWERED_DOWN ThreadsPerCore=1 TmpDisk=0 Weight=1 Owner=N/A MCS_label=N/A
   Partitions=queue1
   BootTime=None SlurmdStartTime=None
   LastBusyTime=Unknown
   CfgTRES=cpu=8,mem=1M,billing=8
   AllocTRES=
   CapWatts=n/a
   CurrentWatts=0 AveWatts=0
   ExtSensorsJoules=n/s ExtSensorsWatts=0 ExtSensorsTemp=n/s
Update the compute nodes#
Before building the software, verify that you can update the compute nodes from the c5n.4xlarge to c5n.18xlarge
By updating the compute node from a c5n.4xlarge (max 8 cpus per compute node) to c5n.18xlarge (max 36 cpus per compute node) would allow the benchmark case to be run on up to 360 cpus ( 36 cpu/node x 10 nodes ).
Note
Provisioning 10 c5n.18xlarge in one region may be difficult. In practice, it is possible to obtain 8 c5n.18xlarge compute nodes, with 36 cpu/node x 8 nodes = 288 cpus.
Note
The c5n.18xlarge requires that the elastic network adapter is enabled in the yaml file. Exit the pcluster and return to your local command line.
If you only modified the yaml file to update the compute node identity, without making additional updates to the network and other settings, then you would not achieve all of the benefits of using the c5n.18xlarge compute node in the ParallelCluster.
For this reason, a yaml file that contains these advanced options to support the c5n.18xlarge compute instance will be used to upgrade the ParallelCluster from c5n.5xlarge to c5n.18xlarge.
Exit the cluster#
exit
Stop the compute nodes#
pcluster update-compute-fleet --region us-east-1 --cluster-name cmaq --status STOP_REQUESTED
Verify that the compute nodes are stopped#
pcluster describe-cluster --region=us-east-1 --cluster-name cmaq
keep rechecking until you see the following status “computeFleetStatus”: “STOPPED”,
Examine the differences between YAML files#
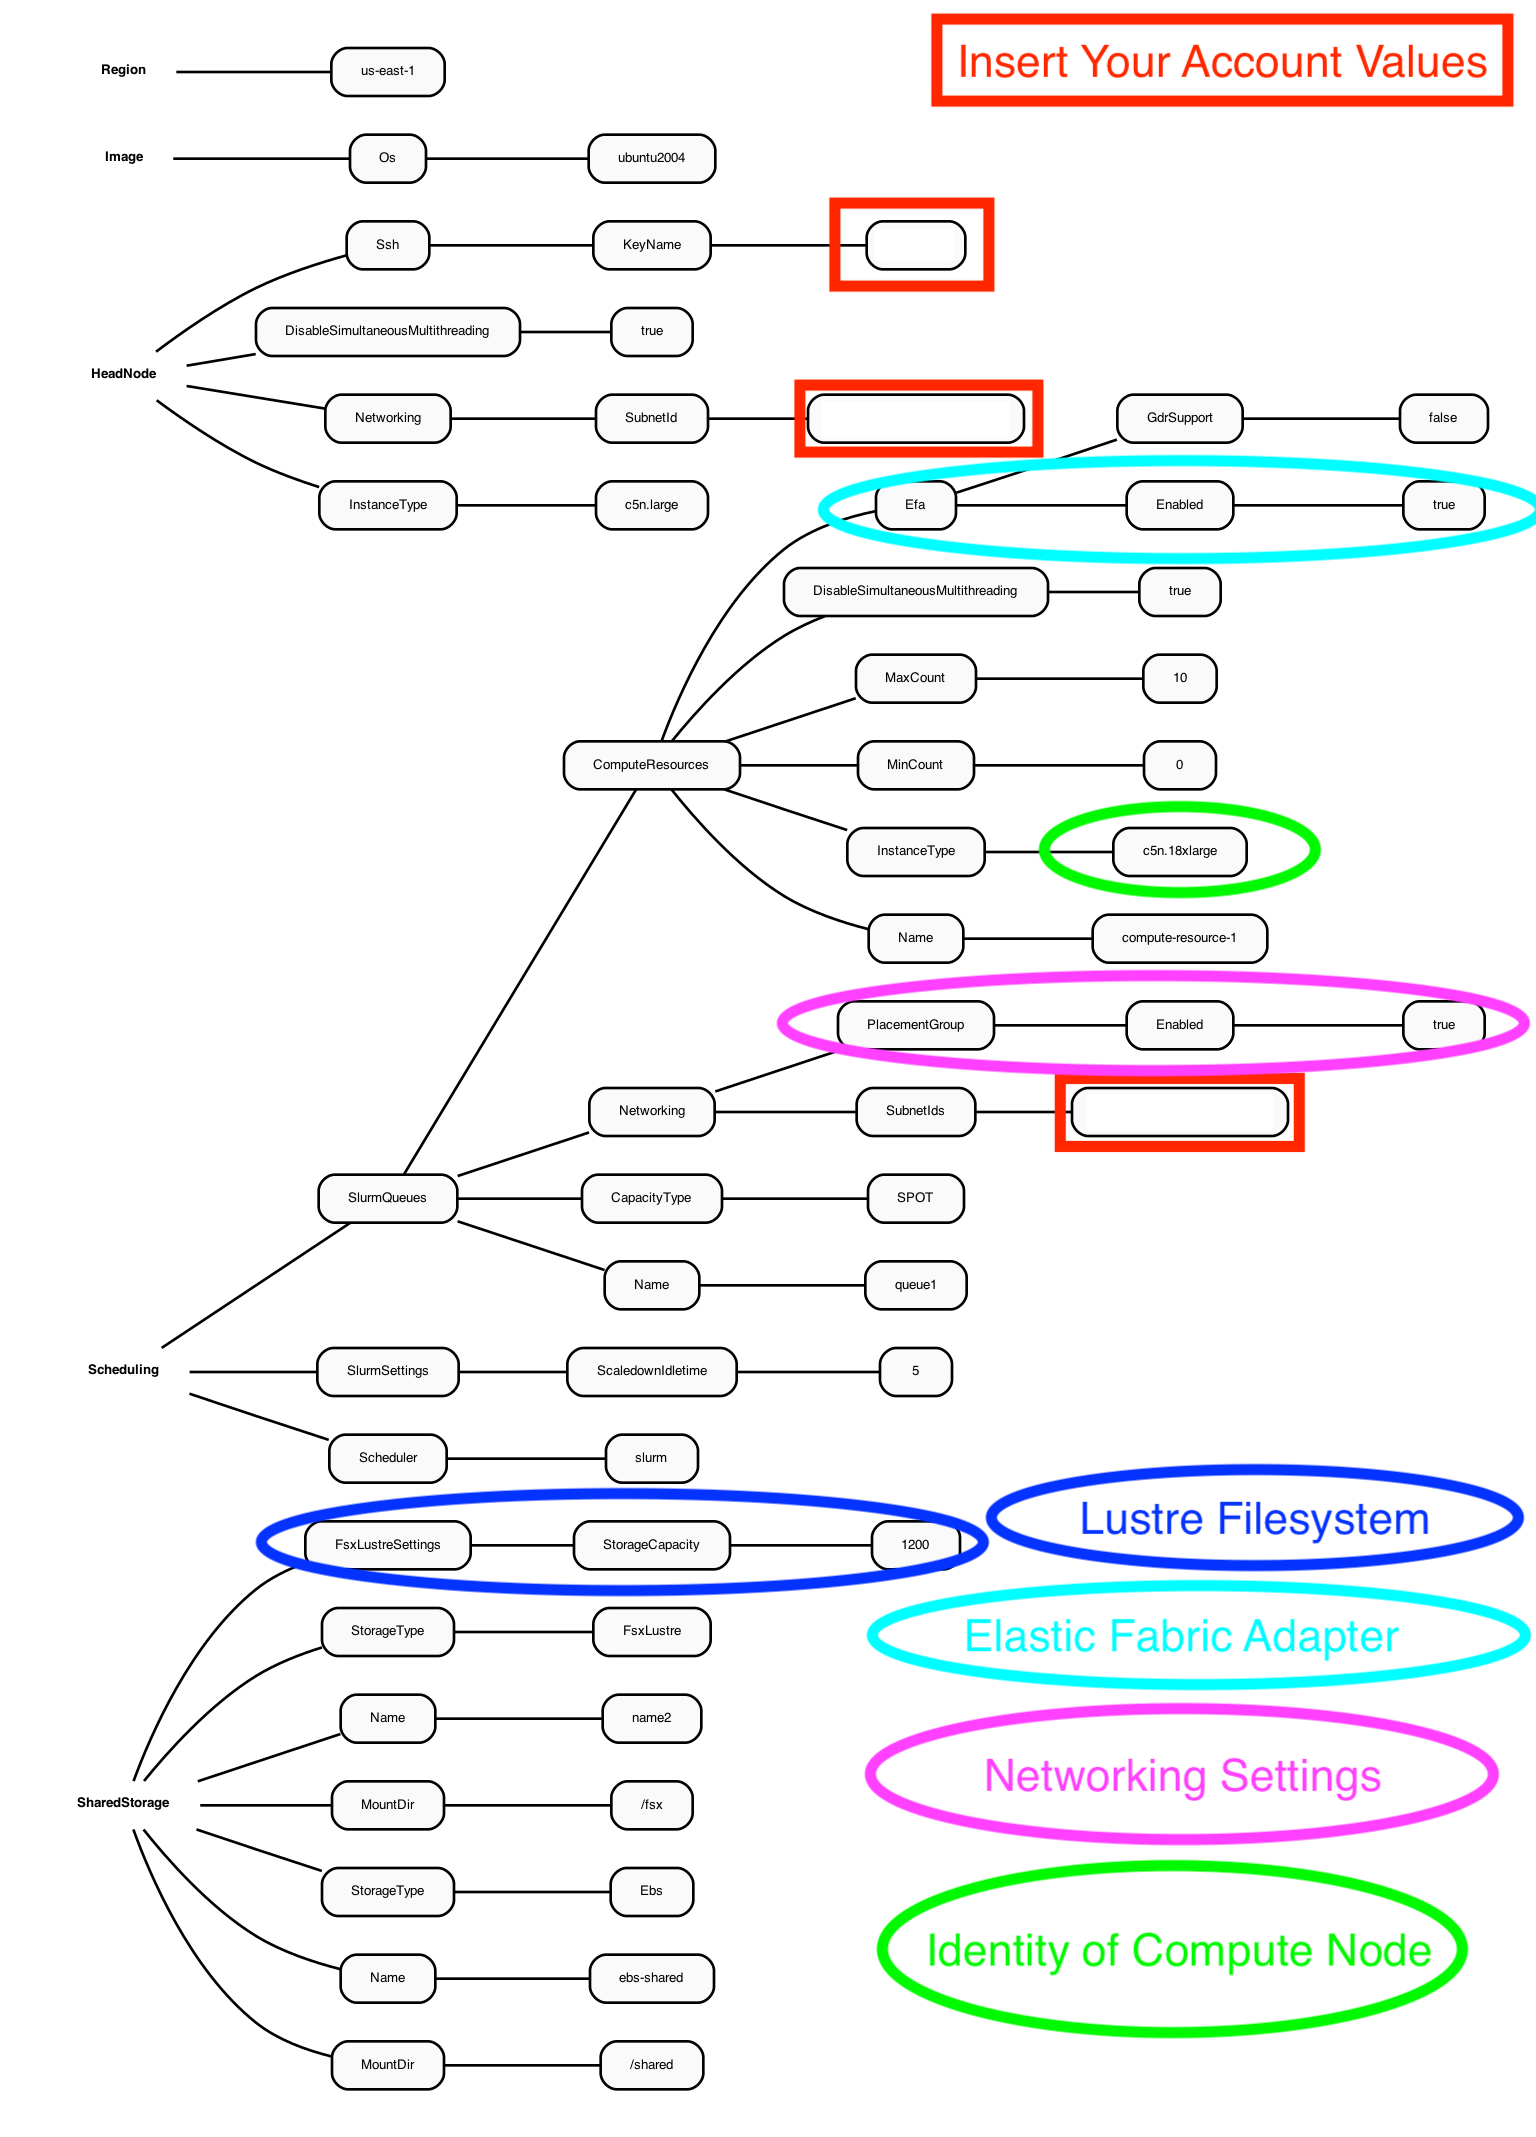
The YAML file for the c5n.xlarge head node and c5n18xlarge compute Node contains additional settings than the YAML file that used the c5n.4xlarge as the compute node.
Note
the c5n-18xlarge.yaml is configured to use SPOT instance pricing for the compute nodes.
the c5n-18xlarge.yaml is configured to the the c5n-18xlarge as the compute node, with up to 10 compute nodes, specified by MaxCount: 10.
the c5n-18xlarge.yaml is configured to disable multithreading (This option restricts the computing to CPUS rather than allowing the use of all virtual CPUS. (72 virtual cpus reduced to 36 cpus)
the c5n-18xlarge.yaml is configured to enable the setting of a placement group to allow low inter-node latency
the c5n-18xlarge.yaml is configured to enables the elastic fabric adapter
Figure 2. Diagram of YAML file used to configure a ParallelCluster with a c5n-xlarge head node and c5n-18xlarge compute nodes(36CPU per Node)

Note
Notice that the c5n-18xlarge yaml configuration file contains a setting for PlacementGroup.
PlacementGroup:
          Enabled: true
A placement group is used to get the lowest inter-node latency.
A placement group guarantees that your instances are on the same networking backbone.
Edit the YAML file for c5n.n18xlarge#
You will need to edit the c5n-18xlarge.yaml to specify your KeyName and SubnetId (use the values generated in your new-hello-world.yaml) This yaml file specifies ubuntu2004 as the OS, c5n.large for the head node, c5n.18xlarge as the compute nodes and both a /shared Ebs directory(for software install) and a /fsx Lustre File System (for Input and Output Data) and enables the elastic fabric adapter.
vi c5n-18xlarge.yaml
Output:
Region: us-east-1
Image:
  Os: ubuntu2004
HeadNode:
  InstanceType: c5n.large
  Networking:
    SubnetId: subnet-018cfea3edf3c4765      <<<  replace
  DisableSimultaneousMultithreading: true
  Ssh:
    KeyName: centos                         <<<  replace
Scheduling:
  Scheduler: slurm
  SlurmSettings:
    ScaledownIdletime: 5
  SlurmQueues:
    - Name: queue1
      CapacityType: SPOT
      Networking:
        SubnetIds:
          - subnet-018cfea3edf3c4765         <<<  replace
        PlacementGroup:
          Enabled: true
      ComputeResources:
        - Name: compute-resource-1
          InstanceType: c5n.18xlarge
          MinCount: 0
          MaxCount: 10
          DisableSimultaneousMultithreading: true
          Efa:                                     <<< Note new section that enables elastic fabric adapter
            Enabled: true
            GdrSupport: false
SharedStorage:
  - MountDir: /shared
    Name: ebs-shared
    StorageType: Ebs
  - MountDir: /fsx
    Name: name2
    StorageType: FsxLustre
    FsxLustreSettings:
      StorageCapacity: 1200
Create the c5n.18xlarge cluster#
Use the pcluster command to update cluster to use c5n.18xlarge compute node
pcluster update-cluster --region us-east-1 --cluster-name cmaq --cluster-configuration c5n-18xlarge.yaml
Verify that the compute nodes have been updated#
pcluster describe-cluster --region=us-east-1 --cluster-name cmaq
Output:
{
  "creationTime": "2022-02-23T17:39:42.953Z",
  "headNode": {
    "launchTime": "2022-02-23T17:48:03.000Z",
    "instanceId": "xxx-xx-xx",
    "publicIpAddress": "xx-xx-xx",
    "instanceType": "c5n.large",
    "state": "running",
    "privateIpAddress": "xx-xx-xx"
  },
  "version": "3.1.1",
  "clusterConfiguration": {
  },
  "tags": [
    {
      "value": "3.1.1",
      "key": "parallelcluster:version"
    }
  ],
  "cloudFormationStackStatus": "UPDATE_IN_PROGRESS",
  "clusterName": "cmaq",
  "computeFleetStatus": "STOPPED",
  "cloudformationStackArn":
  "lastUpdatedTime": "2022-02-23T17:56:31.114Z",
  "region": "us-east-1",
  "clusterStatus": "UPDATE_IN_PROGRESS"
Wait 5 to 10 minutes for the update to be completed#
Keep rechecking status until update is completed and computeFleetStatus is RUNNING
pcluster describe-cluster --region=us-east-1 --cluster-name cmaq
Output:
{
  "creationTime": "2022-02-23T17:39:42.953Z",
  "headNode": {
    "launchTime": "2022-02-23T17:48:03.000Z",
    "instanceId": "xx-xx-xxx",
    "publicIpAddress": "xx-xx-xx",
    "instanceType": "c5n.large",
    "state": "running",
    "privateIpAddress": "xx-xxx-xx"
  },
  "version": "3.1.1",
  "clusterConfiguration": {
  },
  "tags": [
    {
      "value": "3.1.1",
      "key": "parallelcluster:version"
    }
  ],
  "cloudFormationStackStatus": "UPDATE_COMPLETE",
  "clusterName": "cmaq",
  "computeFleetStatus": "STOPPED",
  "cloudformationStackArn":
  "lastUpdatedTime": "2022-02-23T17:56:31.114Z",
  "region": "us-east-1",
  "clusterStatus": "UPDATE_COMPLETE"
}
Wait until UPDATE_COMPLETE message is received, then proceed.
Re-start the compute nodes#
pcluster update-compute-fleet --region us-east-1 --cluster-name cmaq --status START_REQUESTED
Verify status of cluster#
pcluster describe-cluster --region=us-east-1 --cluster-name cmaq
Wait until you see
computeFleetStatus": "RUNNING",
Login to c5n.18xlarge cluster#
Note
Replace the your-key.pem with your Key Pair.
pcluster ssh -v -Y -i ~/your-key.pem --cluster-name cmaq
Check to make sure elastic network adapter (ENA) is enabled#
modinfo ena
lspci
Check what modules are available on the cluster#
module avail
Load the openmpi module#
module load openmpi/4.1.1
Load the Libfabric module#
module load libfabric-aws/1.13.0amzn1.0
Verify the gcc compiler version is greater than 8.0#
gcc --version
output:
gcc (Ubuntu 9.3.0-17ubuntu1~20.04) 9.3.0 Copyright (C) 2019 Free Software Foundation, Inc. This is free software; see the source for copying conditions. There is NO warranty; not even for MERCHANTABILITY or FITNESS FOR A PARTICULAR PURPOSE.
See also